Saturday, December 15, 2012

Stable Stack Folk Art Christmas Decor


Need a super-quick Christmas gift? I’m sure I spent more time deciding on fabrics for 
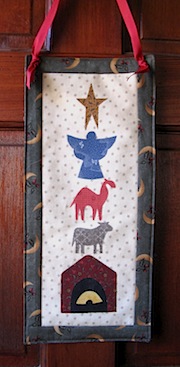
“Stable Stack” than I did actually cutting and sewing it!

There’s a link at the bottom for a printable template page.

Here are the supplies you’ll need:
            Background    5 ½” x 14”
            Border            (2) 1 ½” x 14”
                                   (2) 1 ½” x 7 ½”
            Scraps for Stable—Outer and Inner
                                    Halo
                                    Cow
                                    Camel
                                    Angel           
                                    Star
            Backing          (1) 9” x 17” approx.
            Thin Batting   (1) 9” x 17” approx.
            Fusible Web    1/8 yd
            Ribbon (12”) or Small Hanger

Print the template page and trace each element onto the paper side of your fusible web, leaving at least ½” between the designs. Trace on the dotted line for the Inner Stable. Cut the pieces out ¼” or more away from the traced lines.

Press each traced design to the wrong side of the fabric you’ve chosen for it, following the fusible web instructions. Cut out each one on the line you traced.

Remove the paper from the wrong side of the pieces. Crease your Background rectangle in half lengthwise to provide a guideline for centering the designs. If you have a light box, you may simply lay the template page under your Background fabric to see how to place the pieces. Once they’re in place, press them to the Background.

Sew the 14” Border strips to opposite sides of the Background and press. Add the 7 ½” strips to the top and bottom edges and press.

On your work table, lay the batting, backing (right side up), and pieced top (right side down) as shown in the photo and pin. Begin sewing near a lower corner and sew ¼” from the edge all the way around, leaving a gap for turning.

Clip the corners and turn the piece right side out. Press. Topstitch 1/8” away from the outer edge all the way around, sewing the gap closed. Quilt if you like or leave it un-quilted.

Tie a knot at each end of your ribbon. Use small safety pins on the back going through to catch the knots to hold the ribbon in place, or hand sew the knots to the hanging.

Merry Christmas, Friends!

Tuesday, September 6, 2011

The Value of Values


Over the past couple of years I’ve been learning a good bit about upholstery and home dec sewing. (And I still have MUCH to learn.) Through this work I’ve been privileged to see some absolutely gorgeous homes. I think it’s great fun to observe the impact of textiles on a house. Fabric accents—from curtains to pillows to art pieces and more—have the power to calm, brighten, enthuse, and harmonize, to name only a few effects. The opposites of all those positives are out there, too, and, of course both positives and negatives are extremely subjective. 

I imagine that most of the population (and I know EVERYBODY-ha, ha) pays little attention to the “fabric of our lives”, but for those of us who do, isn’t it a pleasure to walk into a room, enter a store, or peruse a decorating magazine and analyze its effect on us? Do you look for fabric touches and try to determine if they’ve been included intentionally or simply because, let’s say, a sofa was needed and someone liked the color red?

All that to say, if you’re dissatisfied with one of your own rooms and hoping to improve it with textiles, there are some general design principles that may help as you make decisions. There are plenty of brilliant, gifted, generous designers who share their knowledge through a variety of media, so I won’t attempt to list all the possible considerations for changing or adding to your décor, but I do want to remind you of one that is true for quilting, home dec, and the visual arts. It’s VALUE. Unfortunately, that’s an overused word that can mean several things, but in relation to design it means how light or dark something is. For a room, a quilt, a painting, etc., to produce the effect you want—visually, as well as emotionally—it’s critical that there be some difference in value included, be it a subtle or a bold one.  An extreme illustration of a lack of value difference would be a room in which every single element is white. Take that example further and imagine that every piece of furniture is made of wood that’s been painted white. Pretty boring, huh? Now imagine adding cappuccino-colored cushions to the sofa and chairs, and then a few throw pillows in medium to dark shades of brown (or red or green or blue. . .).

I’m probably not telling you anything you haven’t heard, but if you’re new to quilting or home dec sewing, you may be intimidated by the amazing amount of choices that are out there. Before I go any further, though, let me say that if you really like a combination and you’re the one who’s going to be living with it, FORGET THE RULES! But it may be that observing the “value rule” will make you even happier with your choices.

One of my first upholstery projects was a sweet little wingback chair for an artist friend of mine. Look at the photo and think about what makes the chair and the room work. It may not be your style, but I’m sure you’ll appreciate the beauty of her choices both in color and value. Send a photo of one of your favorite rooms to kara@greenchairstudios.biz, and I’ll share it here in the blog.

One last fun thing: www.polyvore.com is a website that was originally geared toward wearable fashions, but now has some fun interior design pages. You can use Polyvore to create a layout of a group of individual items you like. It’s fairly simple to use, so if you’re in the mood to play interior decorator or fashion consultant, it’s the place to go.

Wednesday, August 17, 2011

Stringing You Along. . .Part Two


There are a number of ways to finish the table runner. I experimented with a new idea and was happy with the results. The steps below explain it.

Lay the fabric for the sides—we’ll call it Fabric A—on your cutting table right side up. Place the batting with the string path on top of it, right side up. This may seem counter-intuitive, but trust me on this! Trim Fabric A to match the edges of the batting and pin in several places to keep the pieces aligned.
Set your machine on the longest straight stitch it will sew. Stitch through all layers along the lines you drew in the very first step. These lines are covered with fabric now, so you’ll have to estimate where the lines are, based on where you trimmed the string path. It isn’t critical that you sew exactly on the original lines.
Turn the piece over and cut Fabric A ½” away from the stitching toward the center of the piece. You can eyeball the ½”. Cut beside both lines that you sewed in the previous step. 'Thought I took a photo of this step, but I can't find it. At this point, there will be a channel of Fabric A cut away (1/2" from the long stitches you just sewed).

Remove the long stitches, and bring the Fabric A pieces around to the top side. Lay them in place beside the string path, with outer edges of the Fabric A pieces matching the edges of the batting. Fold under ½” along the curves and pin the edge in place on the string path. You’ll need to clip any concave curves almost to the seam line every ½” to get a nice, smooth fold.

Using the same thread that you plan to quilt with, topstitch as near the folded edges as possible, sewing through all layers.

Before cutting the back to fit, lay it on your cutting table right side up. Lay the table runner on it, wrong side up, and pin the edges. You may trim the backing fabric to match at this time or after you sew around the edge, which is my preference. 

Begin sewing near the center of one end, backstitching as you start. Sew around all four edges, leaving a 6-8” gap for turning the runner right side out. Backstitch where you stop.

Clip diagonally across the corners almost to the seam line. Turn the runner right side out and press, folding under the fabric at the gap ¼”. Topstitch all the way around the edge a SCANT ¼” away. Quilt as much or as little as you like, and you’re done!

Monday, August 8, 2011

Stringing You Along. . .Part One


If any of you were holding your breath waiting on the string-pieced project that I promised in the last blog—I’m sorry! Should I send flowers or a memorial gift?

I’ve been surprised lately that my taste in home décor is leaning more and more toward the contemporary. You’ll see it reflected in the project that follows. But I sincerely hope you’ll imagine the possibilities for making it in several different styles.

The instructions are for a particular size table runner, but don’t hesitate to ask if you need help figuring out yardage or pieces to cut for a larger or smaller version.

STRING-PIECED TABLE RUNNER ~ 15” X 48”

Cut a piece of cotton batting 15” X 48”. Using a permanent marker, draw two curved lines along the length of the batting. These lines are the “path” for string piecing. If you prefer something less freeform, use a ruler and draw 2 straight lines that are 4” apart.

Gather a pile of scraps or strips left from other projects for the string piecing. It’s helpful but not essential that the scraps have at least one straight edge. If you can sew a straight line without a straight edge as a guide, you can use any scrap that’s at least 1”-wide and as long as the width of your string path. I decided to create a color gradation as I went along, but choosing pieces randomly would be pretty, too (and simpler and quicker).

Place a strip in the approximate center of the string path, right side up. Lay a piece at a slight angle on top of it, right sides together, but not lining up the edges of the strips.

Flip the second piece away from the first to see if the drawn lines will be covered once the strip is sewn to the first. 

Sew a straight line along the right-hand edge of the top strip 1/4” away. It should begin and end at least ¼” beyond the lines you drew on your batting. Trim the seam allowance of the underneath piece if you’re concerned that it might show through or if you want to eliminate some bulk. Appliqué scissors are helpful for this step. You may trim the ends of the strips ½” away from the drawn line at this time or later.

Flip the second strip away from the first, and press it with your fingers. Since the batting is cotton, the strip will cling to it, and you may not even need to use an iron to press. I didn’t press with an iron until I had sewn all the strips to the batting.

Continue adding strips, varying the angle with each one that you add. Notice in the photo that even oddly shaped pieces can work. You may straighten out the edge before or after sewing it. 

Cover the string path all the way to one end and then begin adding strips going the other direction from the center.

After covering all of the string path, trim the edges to where you stopped sewing when you added the strips.
For the fabric that will be on each side of your string path, you'll need 1-1/2 yards. That will include enough for the backing. I’ll explain the remaining steps in the next blog. In the mean time, sew your strips to the batting and let me know how it’s coming along for you.